
How to Set Up CCTV Cameras: A Complete Tutorial for Beginners – Installing Cctv
Learn the installation of CCTV cameras step-by-step in this beginner’s guide. Secure your space today with this simple, expert-backed CCTV installation tutorial.
Are you overwhelmed by the thought of setting up CCTV cameras on your own? You’re not alone. Many homeowners and small business owners feel daunted by the wires, configurations, and jargon involved. But here’s the truth: modern surveillance systems are easier to install than ever—and doing it yourself can save money and give you peace of mind.
Installation of CCTV Cameras
This tutorial will guide you through the entire process of CCTV installation. From choosing the right system to testing, you’ll learn everything step by step.
By the end of this guide, you’ll have the knowledge and confidence to complete the installation of CCTV cameras like a pro.
Step 1: Understand Your Security Needs
Before purchasing anything, assess your security goals. Ask yourself:
- What areas need surveillance?
- Do you want 24/7 recording or motion-activated alerts?
- Is audio recording important?
Indoor vs. outdoor? Wired vs. wireless? Understanding your needs sets the foundation for the entire CCTV installation process.
Step 2: Choose the Right CCTV Camera System
Once you’ve outlined your needs, it’s time to choose a system. Here are your main options:
Types of CCTV Cameras:
- Dome Cameras: Great for indoor use with a sleek, low-profile look.
- Bullet Cameras: Ideal for outdoor coverage with long-range visibility.
- PTZ Cameras: Pan-Tilt-Zoom features offer maximum coverage.
- IP Cameras: Network-based with higher resolution and remote access.
DVR vs. NVR Systems:
- DVR (Digital Video Recorder): Works with analog cameras.
- NVR (Network Video Recorder): Designed for IP cameras and offers better flexibility and image quality.
Pro Tip: Opt for HD or Full HD CCTV security cameras for clearer footage.
Step 3: Plan Camera Placement Strategically
Where you install CCTV cameras determines how effective your system will be. Avoid blind spots and ensure wide-angle coverage.
Best Practices for Placement:
- Place cameras 8–10 feet above ground.
- Focus on entry points: doors, windows, driveways.
- Keep cameras out of direct sunlight and harsh weather.
Use this guide to secure your home effectively for further tips.
Step 4: Gather Your Tools and Materials
Here’s what you’ll need for the installation of CCTV cameras:
- CCTV security cameras and DVR/NVR
- Monitor (TV or PC screen)
- Coaxial or Ethernet cables (based on camera type)
- Power adapters and/or PoE switch
- Drill and mounting tools
- Cable clips or conduits
Having all materials ready will make installing CCTV cameras much smoother.
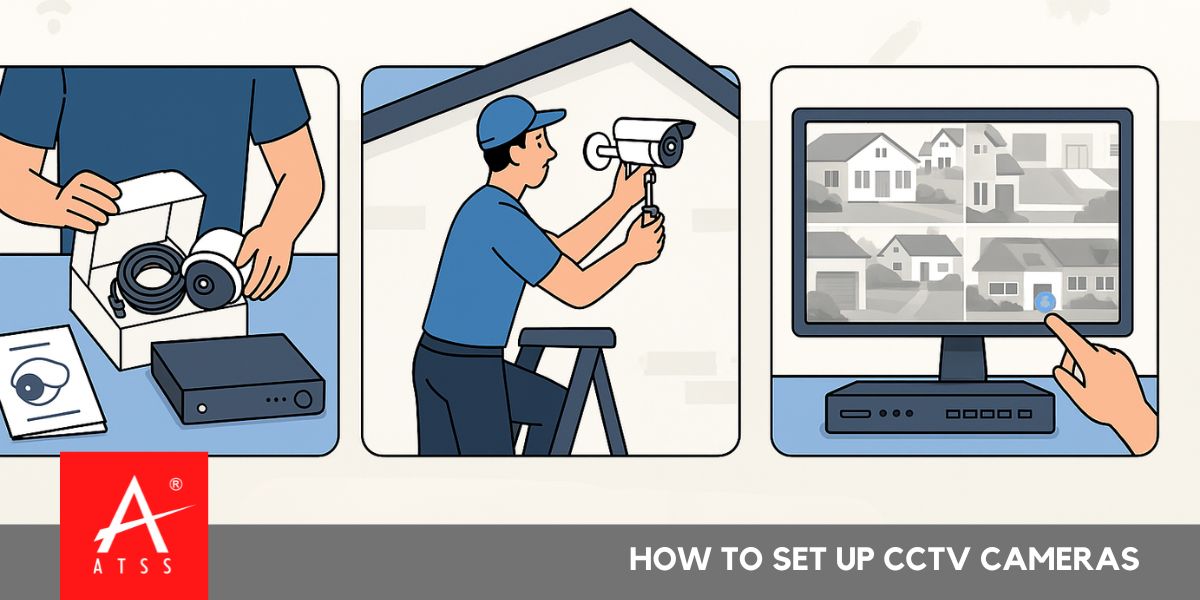
Step 5: Mount the Cameras
Now, let’s get hands-on.
- Use the mounting template to mark drill holes.
- Drill holes and fix the mounting bracket.
- Attach the CCTV security camera to the bracket.
- Adjust the angle as needed.
Ensure cables are not exposed or vulnerable to tampering.
Step 6: Run the Cables
For wired systems, this is the most time-consuming part:
- Route cables through walls, ceilings, or conduits.
- Keep wires organized and secured with clips.
- Label each cable to avoid confusion later.
If you’re using wireless cameras, you still need power cables unless your system is battery-powered.
Step 7: Connect to DVR/NVR and Monitor
This is where it all comes together:
- Connect cameras to DVR/NVR.
- Use HDMI/VGA to link DVR to your monitor.
- Plug everything into a power source.
- Turn on the system.
Reminder: Check user manuals for exact configuration steps for your CCTV security camera installation.
Step 8: Configure Camera Settings
Once your system is powered up, set preferences:
- Adjust recording schedules.
- Enable motion detection.
- Set up remote viewing through a mobile app.
- Configure notifications and cloud backup (if supported).
Step 9: Test and Fine-Tune Your System
Before considering the job done:
- Walk in front of cameras to check motion triggers.
- View footage on monitor and mobile app.
- Adjust camera angles if needed.
- Make sure night vision and audio are functioning.
Testing ensures your investment in CCTV installation is effective from day one.
FAQs About Installation of CCTV Cameras
Q1: Is professional installation better than DIY?
A: Not necessarily. DIY is cost-effective and easy with plug-and-play systems. However, large premises may benefit from expert help.
Q2: Can CCTV cameras work without internet?
A: Yes. While remote viewing requires internet, local recording works independently.
Q3: What is the lifespan of a CCTV system?
A: With regular maintenance, your CCTV security camera installation can last 5–10 years.
Final Thoughts: Take Control of Your Security
Setting up your own surveillance system might seem intimidating, but with the right tools and guidance, it’s totally doable—even for beginners. Whether you’re protecting your home, shop, or office, a well-done CCTV installation is your first line of defense.
The installation of CCTV cameras doesn’t require expert-level tech skills—just a bit of planning, patience, and this comprehensive tutorial.
Now it’s your turn. Install CCTV cameras and enjoy the peace of mind that comes with a safer space.
👉 Ready to get started? Comment below with your questions or share this guide with someone who needs help with CCTV security cameras installation! | WHATSAPP
Types of CCTV Cameras | CCTV Cameras | CCTV Camera | CCTV DVR | CCTV Camera for Home